I did not have to do anything to the xbees to make them work, they just worked out of the box.
Added names to each one for scanning purposes using the atni <name> command using a serial port, followed by atwr to write the data so it would last through the next powerup.
More on xbee commands here: http://forums.parallax.com/showthread.php?125799-XBee-Series-2-Getting-Started
I had to use this library to communicate with the xbee from the arduino: http://arduiniana.org/libraries/newsoftserial/
This does add a couple of KB to the project.
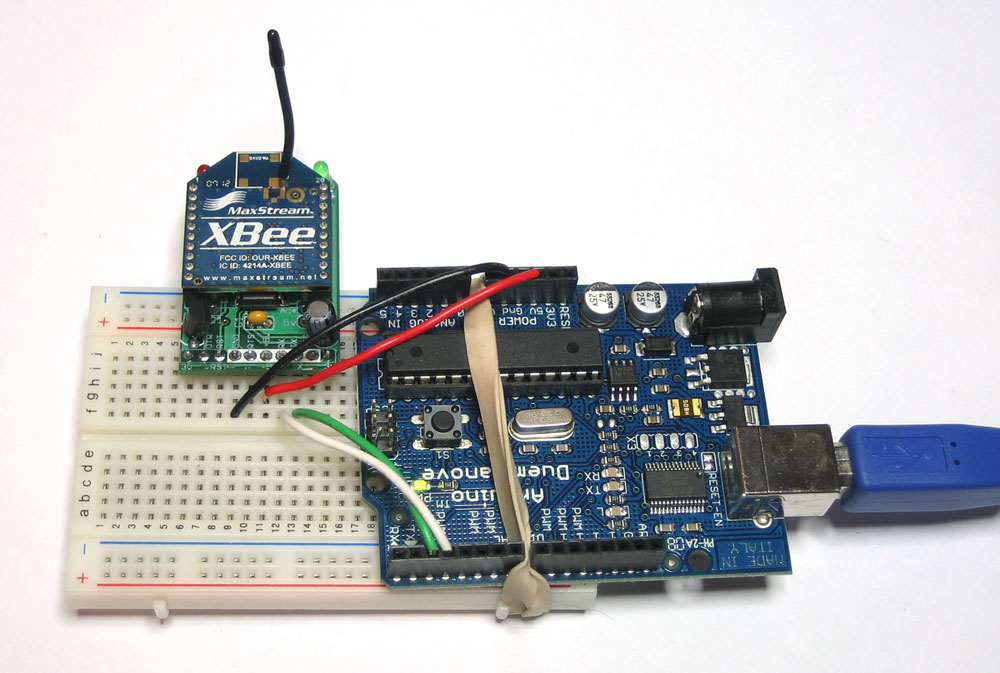
I built the temperature project, then I plugged in the xbee to the bread board, added +5 volt and ground to power the xbee. I hooked a wire from 2 to TX and from 3 to RX and added the library to my environment. This is a picture from someones web site of that: http://www.ladyada.net/images/xbee/arduinowiresimple.jpg
I changed the code to the following so it would output to the xbee instead of the usb serial port. I also added in a counter so you can see if there are any gaps in the temperature. The counter is approximately the correct second from start up as well.
/*     ---------------------------------------------------------

 *     |  Arduino Experimentation Kit Example Code             |

 *     |  CIRC-10 .: Temperature :. (TMP36 Temperature Sensor) |

 *     ---------------------------------------------------------

 *

 *  A simple program to output the current temperature to the IDE's debug window

 *

 *  For more details on this circuit: http://tinyurl.com/c89tvd

 */


#include


//TMP36 Pin Variables

int temperaturePin = 0; //the analog pin the TMP36's Vout (sense) pin is connected to

                        //the resolution is 10 mV / degree centigrade

                        //(500 mV offset) to make negative temperatures an option


 unsigned long time =0;

/*

 * setup() - this function runs once when you turn your Arduino on

 * We initialize the serial connection with the computer

 */


 NewSoftSerial mySerial =  NewSoftSerial(2, 3);


void setup()

{


  pinMode(13, OUTPUT);

//  Serial.begin(9600);  //Start the serial connection with the copmuter

                       //to view the result open the serial monitor

                       //last button beneath the file bar (looks like a box with an antenae)

  mySerial.begin(9600);

  mySerial.println("Hello, world!");

}


void loop()                    // run over and over again

{


 float temperature = getVoltage(temperaturePin);  //getting the voltage reading from the temperature sensor

 temperature = (temperature - .5) * 100;          //converting from 10 mv per degree wit 500 mV offset

 temperature = temperature*9/5 +32;   //to degrees ((volatge - 500mV) times 100)

 mySerial.print(time);

 mySerial.print("\t");

 mySerial.println(temperature);                     //printing the result

 delay(1000);          //waiting a second

 time=time+1;

}


/*

 * getVoltage() - returns the voltage on the analog input defined by

 * pin

 */

float getVoltage(int pin){

 return (analogRead(pin) * .004882814); //converting from a 0 to 1024 digital range

                                        // to 0 to 5 volts (each 1 reading equals ~ 5 millivolts

}
I am so excited to read this post. Do you Know???, I also searched this type of post. Your post is very impressive. You such a great idea to understand XBee module. So, you will getting started with xbee for learning XBee.
ReplyDelete