Sunday, August 19, 2018

Tiny home update: Siding/Roofing is done


My friend and I put all the sheeting on the tiny home today. He has to fear of heights, so he stood on the top of the step ladder and screwed things in, even 12 feet high.

At the hardware store.

3 sheets of siding/roofing done.

A view from the inside after 3 sheets.


Put on all 6 sheets of roofing/siding.

All buttoned up for the next phase.


Thursday, August 16, 2018

Moved Tiny House to final location.

The day finally came where I needed to move the tiny house to its final location so I could finish it up enough to move into the place at the end of the month. The weather had been fighting us for weeks, either 120 degrees, or storming, or both.  A perfect day showed up and we took advantage of the break to move the house.  Just me and a friend moved it 100 feet.  But once it was on the trailer we could have taken it anywhere.


Lifted tiny house up.


Put trailer under tiny house and strapped it on.  Was so well balanced that you could move the tiny house up and down with a single hand.


Tiny house in its final location.  So pretty there. Like a park. 


Next up is tying it to the ground so it can't blow away, siding and roofing it. :D After that will finish the insulation and build windows and doors.

Thursday, August 9, 2018

Monday, August 6, 2018

Mini house update.

An insanely strong storm had winds that tweaked the storage shed walls so they are leaning a couple of inches now.  The storage shed seriously needs plyboard sheeting on it.

The mini house with its curved arch wall trusses has stood up to the storms this summer perfectly. They don't even move in the winds.

I gave 30 days notice to my landlord at the apartment. Paid my last rent.   Scary that I am now forced to move over to the mini house and it needs a lot of work still.

I have all the shelves moved over to the 8x8 storage shed now and loaded up with stuff from the apartment. Sliced out a big chunk of my thumb knuckle taking apart the last shelf. Painful, but I heal absurdly fast.

This weekend I hope to get the mini house moved over to its final location and leveled on blocks.  This will involve a bobcat and a trailer and me and a few strong friends. :D

Then I have 2 paychecks this month to get the siding, roofing and insulation on the mini-house and the storage shed.


After that I need to build windows reusing the glass scanner tops from copiers.  I have about 100 of the glass tops in various sizes.  I also want to build a solar powered water distiller, a solar oven, and a solar composter.

I also managed to get some huge sheets of Plexiglas for free and I am going to build a large solar water heater using plastic tubing and a solar powered water recirculating pump.

I managed to find some 55 gallon metal drums for free that held glycol before.  Going to test build a large rocket mass stove that will heat the mini-home during the coming winter.

I will need to get a gravel road put in across fairly flat ground. And plan on putting in a 4 unit mail box with room for the mail person to pull fully off the road to put the mail in the boxes.  With a couple of large locking containers for packages.

My plan for the electrical system is to start with a 100W solar panel from harbor freight, charging a marine battery. Then use dc to dc converters to charge a single laptop, my phone, a monitor, led lights, and a 12v ceiling fan.  Once I figure out how much power I am using I will be able to add more panels over time to 

Once I am living in the mini house full time in September, I will have a lot more time to get these projects finished.  Will take plenty of pictures and post each project here as I work on them. :D

Saturday, August 4, 2018

How I would run a game company.

This was written a year ago, and the only notion that I have changed is starting with a pre-built game platform rather than writing the first one from scratch.  By starting with a game platform the company would save a decade of time over writing the first one ourselves.

I would start by buying a decent set of core engines that could do First Person, 3/4 perspective, and overhead view.  Then I would use those engines with a set of scripting and graphic tools to allow designers to script and clothe a game at a very high level.  Ideally this high level scripting and clothing system will work the same as the engines are ported across multiple platforms.

I'd require that most graphics be procedurally generated on the fly from tiny description files.  If need be these resulting textures can be cached on disk after they are generated.  This will ensure that the games levels can be transmitted as rapidly as possible over the Internet.  Perhaps while someone is playing one level the next level is downloading in the background and is generating the images so that the level is ready to play as soon as the current level is finished.  Additionally these procedural designs could automatically add more details to the texture map as the game is played on ever newer, more capable hardware.

The game play should just fall out of how the engine interacts with the rules that are set-up in the game script.  Very little should be specifically programmed for any single game.  My game designers can request cool new features for the next release of the engine, but for current development, unless there is a show stopper, they will have to work within the design constraints of the current engine.

As the current generation of games are being built, my core team will incrementally upgrade the core engines to allow more features that have been requested by the designers.  Nothing will ever be totally thrown out and rewritten from scratch. This is very important. I want to write better games, but I want the change sets to be small enough that I can come up with new games every year.

My company would never do vaporware.  I would write new games on new engines every year.  Not a game that nobody sees for 10 years because the technology is rewritten from scratch every couple of years in an endless loop of broken promises.

Another possibility is that old games could be played with the newer engines, extending their lives.

These engines and design tool chains could be leased to 3rd party game designers to create an ecosystem of similar games.  I would just require the end user to download my core engine, and then they could download and play tiny little chapters that tell stories with awesome game play.

The core engine would actually be an entire game platform that interfaced with a web site to allow games to be purchased on the platform and to handle updates of the core, the platform, and the game modules.

Wednesday, June 27, 2018

Floor joist

I have an idea about building a floor joist that would look super cool from below. 

2x6 in the middle sandwiched with a 2x4 on each side, and then a 2x2 on each side of that. Screwed and wood glued it would be the equivalent of a joist that was like a foot wide, the arch/stair step structure taking the load down to bottom of the main beam. 

Best part is that these beams  could be pieced together, the main beam with two bolts with washers and nuts pulling the board together at the top and the bottom.  The 2x4 and 2x2 could just be lapped, as long as no seams lined up within about a foot.  Also lower grade would can be used, as long as bottom edge is free of knots.

Tuesday, May 8, 2018

Building a tiny home.

In the next few months I am going to build the shell of my first tiny home. Going to keep this first one simple. More of a cabin than anything else.

The building will be built in phases, due to not having enough resources, time and money, to do it all at once.


Phase 1

Phase 1 has two steps

First step is to build an 8x12 mini-house to securely live in while I build.  This is also going to be a scale model of the actual cabin. 

I decided to go with  a gothic arch structure because it was more efficient and pretty.  I was able to use less material and save money but it took more time and skill to build.

Because the wall is thicker it will be insulated better. The top will have at least 2 feet of insulation, but it will only be 3 feet wide.  Much of the rafter is hollow,  it won't thermally transfer as much heat.

Because the top is so narrow, there is half the air volume to heat or cool, and a single ceiling fan should rapidly circulate the air. The top will also be rounded.

The roof is too steep to hold snow and rain will run off easily.  The curve will reflect away solar rays better, resulting in less heat being transfered into the structure.

A curve is much stronger than a strait edge. Any wind that hits the curve gets deflected up rather than catching like it would on a normal wall.

Built the form for the rafters on the platform.
There is one almost ready to remove. 
The stack slowly but surely accumulated over 2 weekends.
Fixed a crack in a board.
Had to fix an arch.
I put together one side by myself.
Had to get a second person to help me set it up.
Held in place with a board on each side.  Fastened at the bottom of all rafters.
Added a rafter to each side to tilt the ridge board to correct angle.
All 7 in place, just as the battery ran out of power.
People have told me several times that it looks like a church.
Side view.
Pretty view.
Tarped it until I have the resources to put real plywood sheeting on it in the middle of next month. There is also a giant X in the middle of the building to brace the structure end to end. The arches seem to make it amazingly strong side to side.  A friend was there during a powerful wind storm and he said the building didn't budge at all.
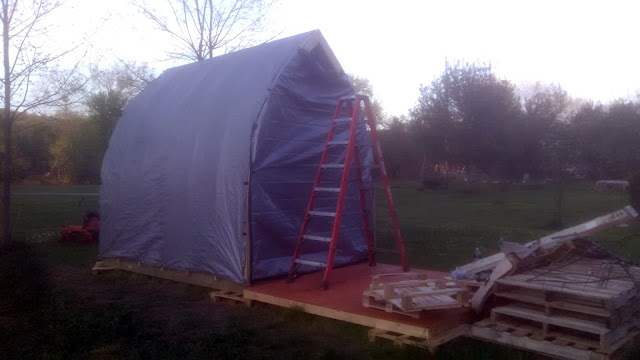
Ladder is sitting on the 8x8 shed floor that I am going to build this coming weekend.

After a recent storm.  A swing and a miss. 

I keep getting asked what plans I used... didn't use any.  I just winged it and built it how I felt it should be.

I found some improved bolts to use to replace a bunch of wood screws.  They use special bits that won't strip out like the Phillips I have been using so far. These bolts are like 10 times sturdier than wood screws.  Putting them at the base of every rafter and they go through the rafter, through the side board, and into the 2x8 boards that go from side to side.

Second step of phase 1 is to build a more conventional 8x8 storage shed with a barn style roof. :D  This is my plan on downsizing.  Whatever doesn't fit in the storage unit, gets tossed.

Tried building the 8x8 storage shed base from 2x4's, but it was way too flexible and bouncy. I think it would have eventually broke.
So I rebuilt the floor joists with 2x6's and then put three 2x4's across the other direction. I notched the center joist and the 2x4's and the base became very solid.
Moved to almost the final location.  After seeing the area after heavy rain, I need to move it 10 feet further back to get out of a swampy area.

If you look just past the little tarped building, to the left, you can see the giant maple tree that the storm took.

Step 3 of phase 1

This step will be to put t1-11 siding around the 8x8 building and around the

 Phase 2

Second phase is to build the full home.  Thinking of scaling up the Gothic arch structure with an overhead area.  Using metal roofing for the side.


Water

Collect rain water from all buildings with roofs. store water in tank below house.  Slowly pump through a

Collect  all the grey water in an aerated tank, the extra oxygen in the water helps stop anaerobic bacterial action and prevent odor.  Use this water to water crops.


Composting.

Tall, continuous operation compost heap. Brick or concrete block,surrounded by insulation. Southern facing single pane windows allow the sun to heat the composting brick. Curtains close at night, or on cloudy days to hold heat in. 

Top of composing system will accept input and the processed soil will be shoveled from an access door.


Washing machine. 

Tiny washing machine. $85 on ebay.

Got one and have been using it for 4 months now.  Works perfectly.


Cooling. 

Super insulated energy efficient.


Energy.

Solar panels charge  a couple of marine batteries. Battery pack will keep things powered.  

The main energy draw day to day will be a solar powered fridge and freezer.


Heating.

Solar water heating for shower.  Backup on cold days?  Copper tubing on rocket mass wood stove.

Buying small fridge and super insulating it.


Data connection and local network. 

DSL data conneciton.   VPN preserves data privacy against ISP and government spying.


Saturday, March 17, 2018

TINY HOUSE SOLAR SYSTEM


If you have been thinking about building a tiny home for a while you have probably also been thinking that it would be easy to live off the grid with such a home.

We love to hear people's stories about how they sized their solar panels, assembled all the parts and talk about how it all goes together.  Knowing what to look for, and what worked and did not work for other people is a big help on our own projects.

What makes this project interesting is how far North it is, and that the project was built on the ground instead of mounting the panels on the roof.  This is important in Canada because of the snow loads. 

We have covered many different sized solar projects before.